Home » Thoughts and Musings » Thomas M. Tuerke on Model Railroading »
Table of Contents [show/hide]
 

Adios, Arnold: Replacing Arnold Couplers with Kato Buckeyes

As model railroaders, we routinely make concessions to scale. Either overscale details (like handrails) or loss of detail altogether. Thicker wheels. Larger flanges. And more. But for N scale, Arnold (aka Rapido) couplers should not be one of them. (At least I don’t think so.)

There are a lot of alternatives out there. Kadee (now MTL,) Accumate, McHenry, and more are options.

In my case, modeling Japanese railroads, operations doesn’t involve a lot of switching, so the per-unit expense of fully operable kuckle couplers isn’t warranted for me.

Conveniently, Kato itself makes a set of couplers (11-702, seemingly named “buckeyes") that function reasonably well. They couple on straights and curves, they stay coupled under a variety of circumstances, and they uncouple—albeit manually—without too much effort. And they look fairly reasonable, too.

Oh, and a pack of 20 is a few bucks.

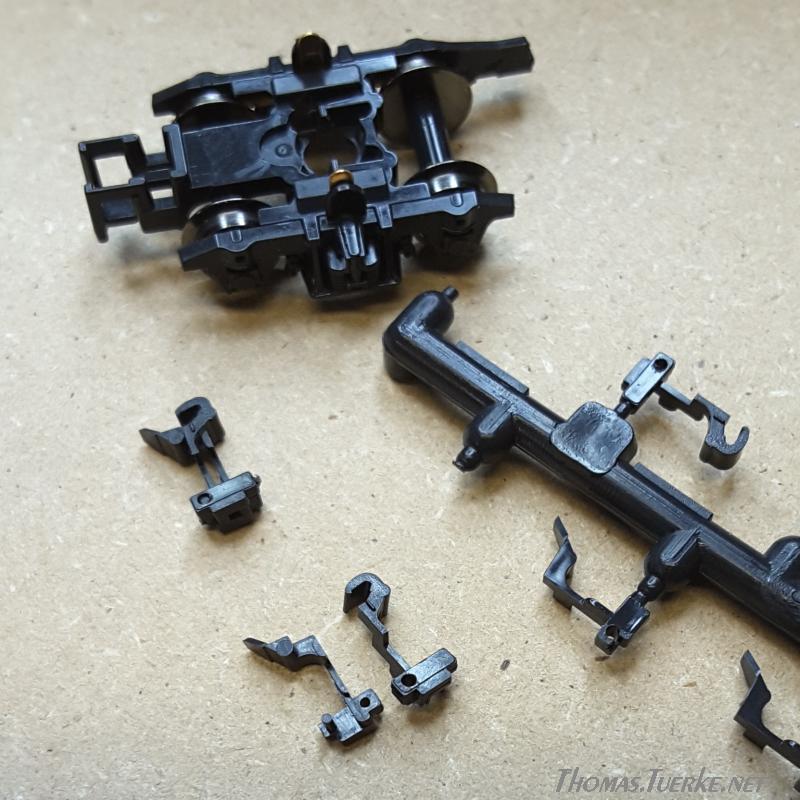
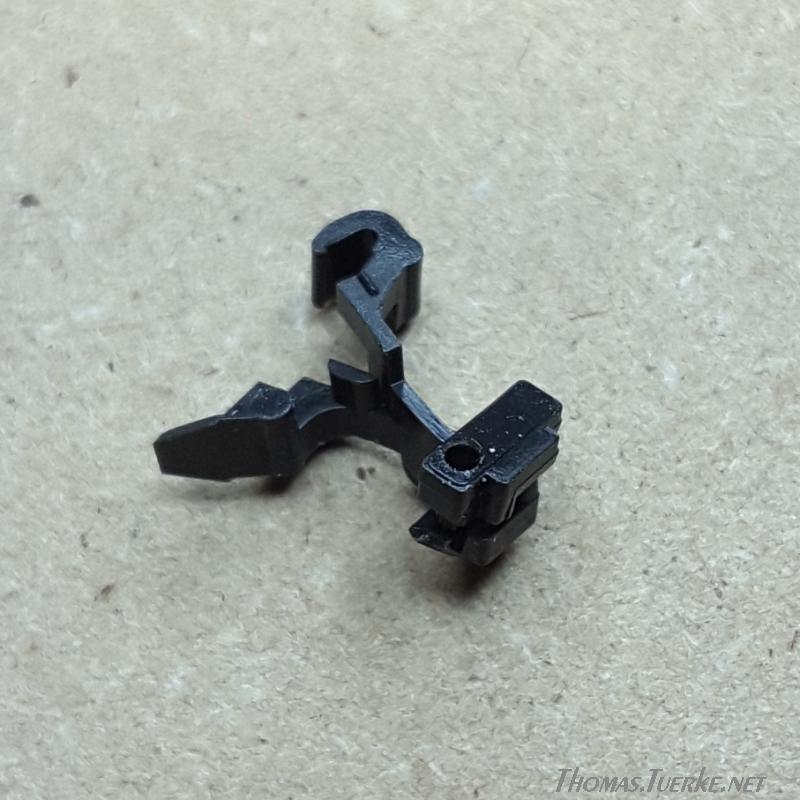
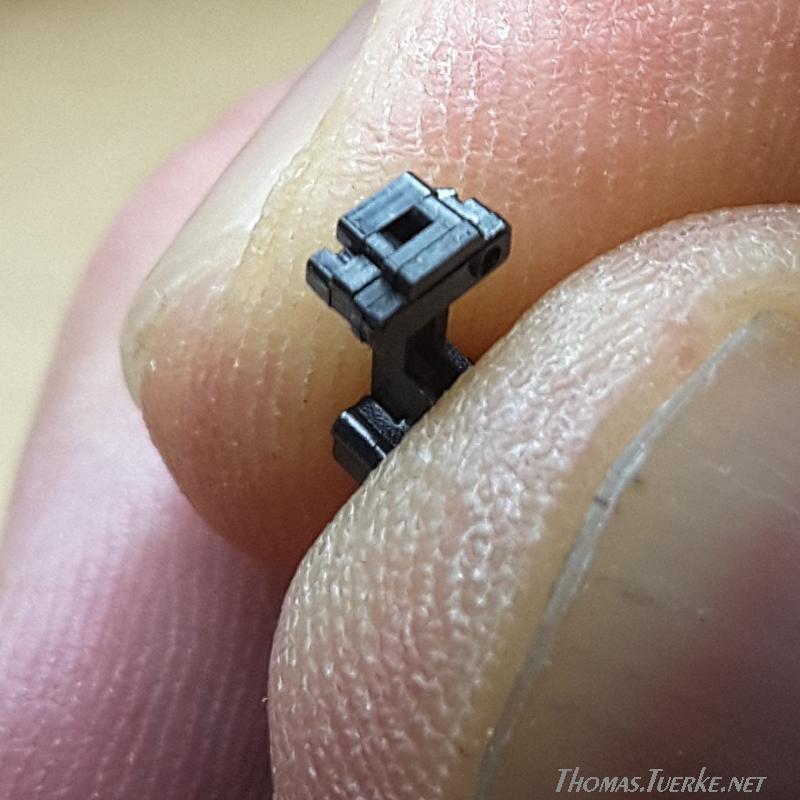
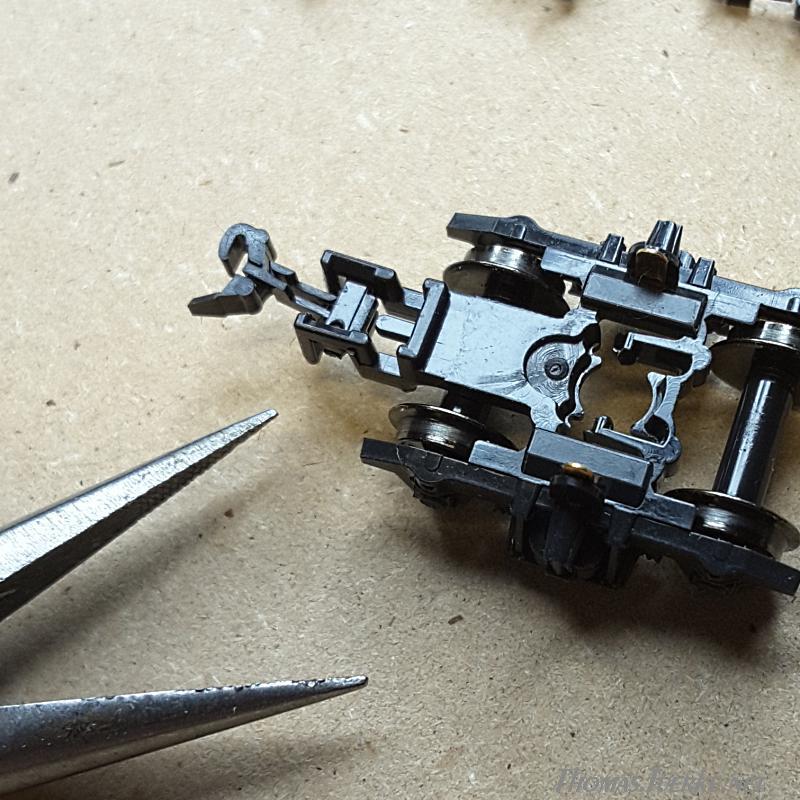
The rub: some assembly is required.

Given that there hasn’t been much info about these (at least not in English, so far as I can tell) let me share my experiences.

Basic facts

  1. Most Kato JR locomotives come with Arnold couplers, but have an alternate pair of couplers stashed away in one of the little plastic bags of accessories. Those couple just fine with the 11-702's. Given that that they’re designed for that specific locomotive, odds are that they’ll fit much better than the more generic buckeyes, so use those.
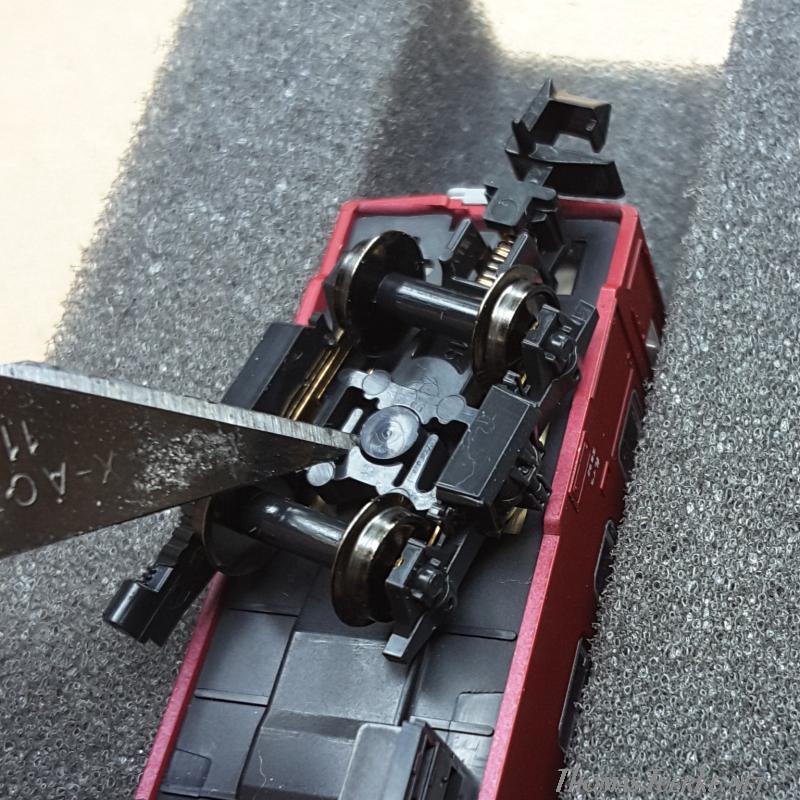
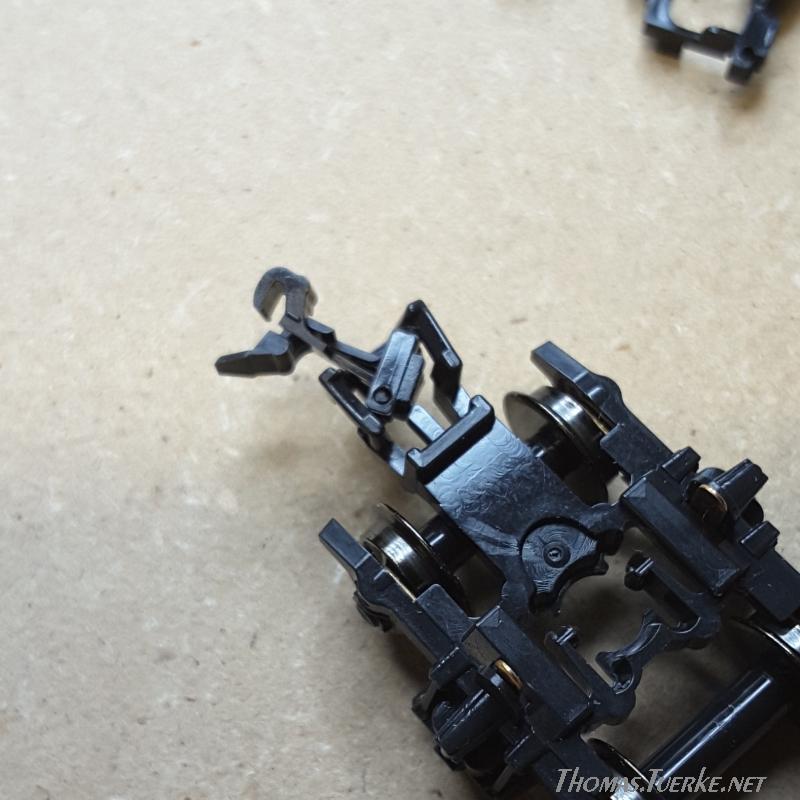
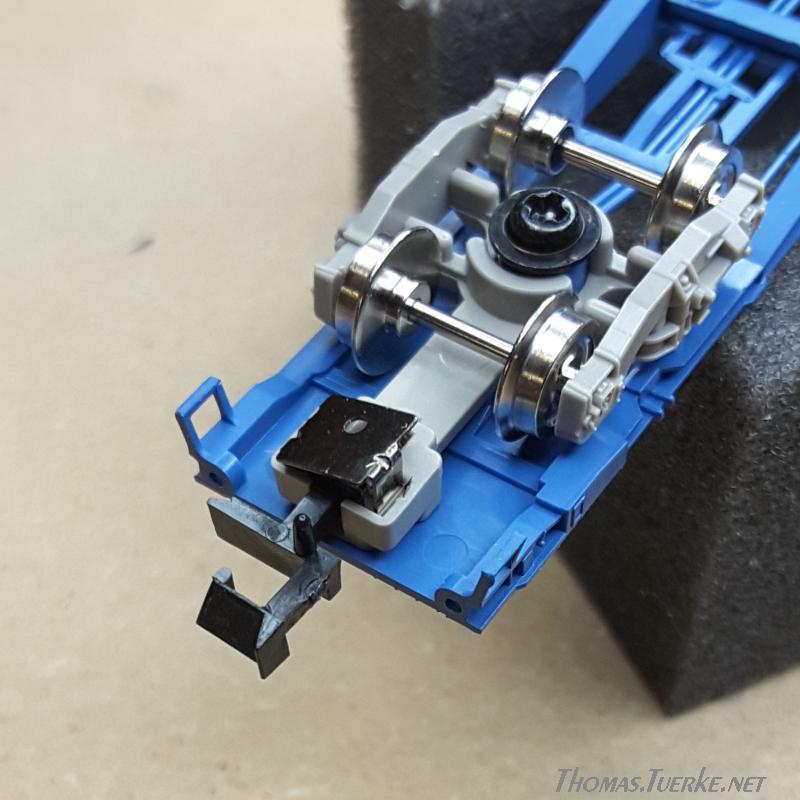
  2. Kato freight (and some passenger) rolling stock comes with Arnolds. It is for these that the buckeyes are designed. Replacement is typically fairly easy. (See below.)
  3. Other Kato passenger rolling stock—DMUs, EMUs, and Shinkansen, for instance—have special, proprietary couplers, typically emulating the appearance of Scharfenberg couplers. You neither need nor want to replace those, since typically those trains are run as units, where you’re not likely to uncouple them except to put them back into their box.
  4. So far, I’ve been able to replace the Arnolds on Tomix rolling stock, too. The coupler fits into the coupler box reasonably well, and fortunately they’re at the same height as Kato’s.
  5. The jury is still out on Tomix locomotives, though I’ve been able to convert one or two, with satisfactory results. Every locomotive is slightly different, typically needing a specialized (Arnold) coupler to fit its coupler box, and I’ve actually filed a pair of buckeyes to fit the shape.
  6. Most Arnold couplers—in Kato and Tomix alike—are set with a tiny metal spring to keep it returning to a center position. With the buckeyes, this doesn’t seem necessary; they seem to return to center on their own, while still having a reasonable amount of play. But if your a stickler (and incredibly patient) you can keep the spring in place while doing the replacement. (If I feel particularly masochistic some day in the distant future, I may go back and reinsert the springs in some of my rolling stock, but I haven’t felt the need to subject myself to that level of abuse just yet.

Oh, and one more thing: using these seems to take about a scale foot (that’s roughly 30 scale centimeters, or 2mm actual) out of the space between cars. That’s between 20-25% of the gap, and fairly noticeable in most cases. (Naturally, that may be a concern around tighter corners, so caveat emptor.)

Comparison

Here we see a comparison of Arnold couplers and the Kato buckeyes. In the upper pair, the two Kato Series 50 passenger cars are visibly closer together. A scale rule below shows the gap to be roughly 5 scale feet (about 1.5 scale meters) for the Arnolds, and significantly less (closer to 4 feet or around 1.2 meters) for the buckeyes. A worthwhile improvement, I think. (And despite the less-than-prototypical appearance, within the shadows between the car, they look realistic enough to pass.)

Arnold/Rapido Kato 11-702 Buckeye
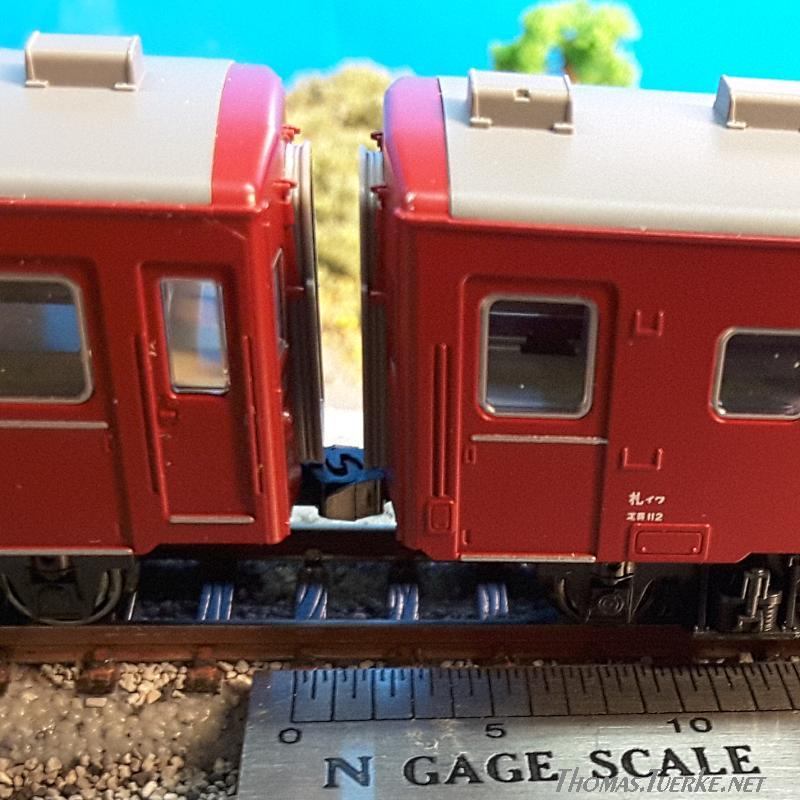
Above: Series 50 “Red Train” Passenger cars. Below: JR KoKi container cars

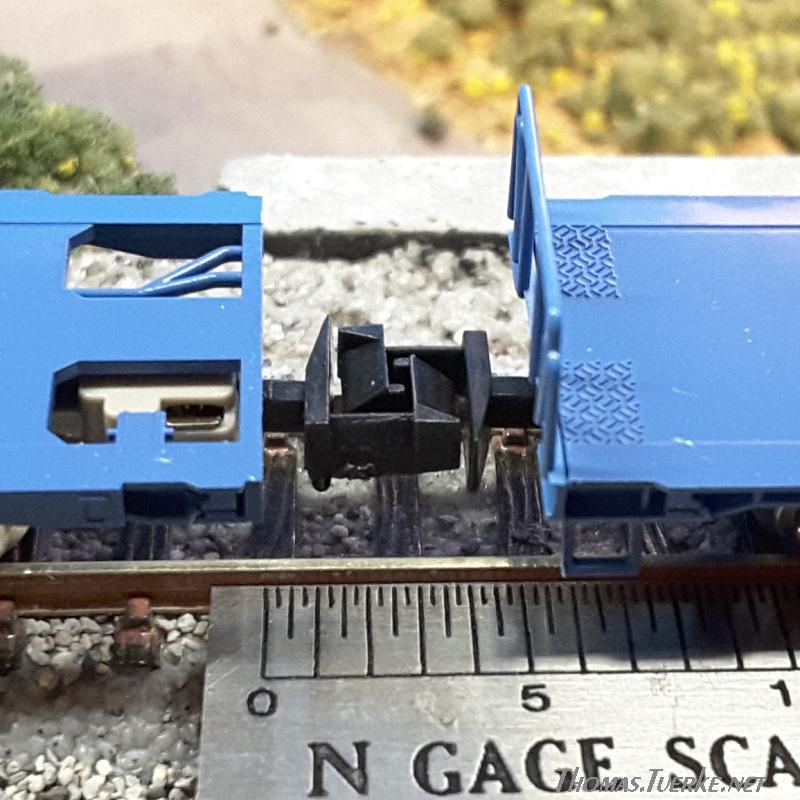
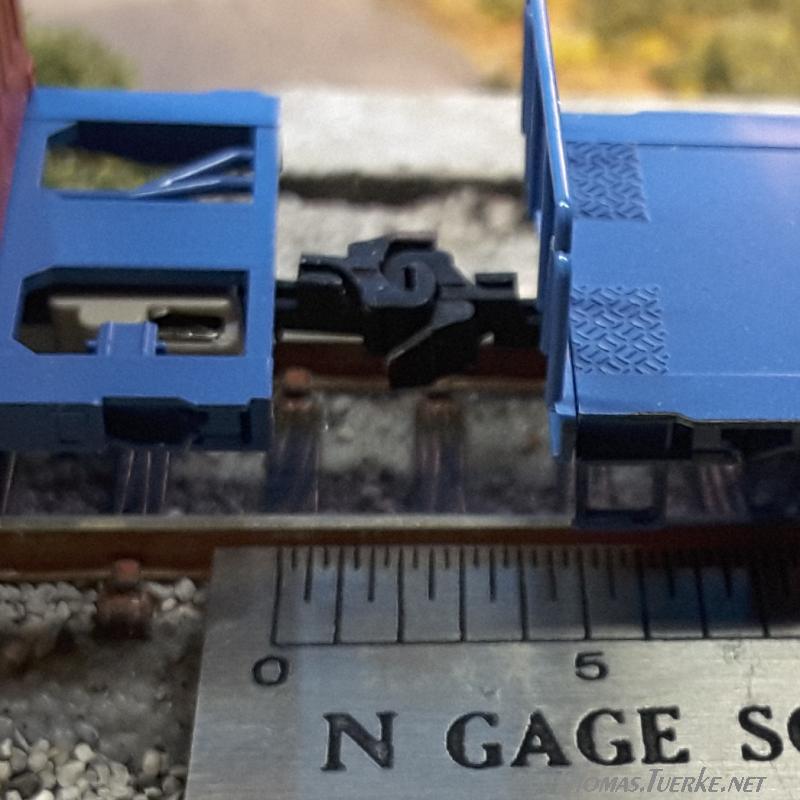
In the second comparison, two Tomix KoKi container cars are coupled, and again, the distance between the two reduces by about one scale foot (.3 meters.) It’s not as obvious here, because the lower profile, but the scale rule suggests it is so.

Assessment

Here we round up the pro’s and the con’s. For me, the pros have it, but your mileage may vary, so look at this and see what you think.

Pro Con
⊕ Flexibility: They can be installed on a wide range of Kato, Tomix, and possibly other rolling stock, to replace the Arnold/Rapido couplers already there.
⊕ Easy to Replace: barring the assembly, once you have a bunch of these put together, swapping out the Arnolds is usually quite fast.
⊕ Appearance: They look much better than the Arnolds they replace.
⊕ Functionality: They work at least as well, too, at least in terms of being able to couple as well as pull cars over track and around curves.
⊕ Smaller Gap: They short the gap between cars by at least a scale foot.
⊕ Cost Effective: In comparison to other couplers, they are very inexpensive.
⊖ Completely manual: Arnolds have facilities for automatic uncoupling, as do Kadee’s et al.
⊖ Proprietary: one of several different styles of coupler which generally don’t interoperate (at least not very well...)
⊖ Assembly required: not recommended for those with “fat fingers” or failing eyesight.
⊖ Not prototypical: While nothing in the N scale pantheon of knuckle couplers takes the cake, these are not even in the running; they look less unprototypical than Arnolds, but that’s about it.
⊖ May impact minimal turn radius by bringing coupled cars closer together.
Verdict
If you’re not concerned with automatic coupling operation (or have large blocks of “unit” rolling stock) these are reasonable alternatives to Arnolds, being neither so garishly unprototypical as they are, nor as expensive—car for car—as other knuckle couplers.
If operations (or more prototypical appearance) is important for you, or you really don’t like fussing with tiny bits of plastic, then you may want to take a pass.

While the conversion is an ongoing process, so far I’ve got a fairly significant chunk of my rolling stock using buckeyes, and they work just fine.


Sections: 1

Assembly and Installation
 — Thomas M. Tuerke

Assembly

The Kato couplers come unassembled. They’re cast plastic, five couplers per sprue, four sprues per pack.

Assembly
Clockwise from right: a sprue with one set of parts removed, the two unassembled parts of a coupler, the assembled coupler, and a Kato truck (aka bogie) with the coupler pocket ready for installation.

Assembling them requires no special skill or tools—an Xacto (or similar) knife or a sprue-cutter, at most—but a little bit of patience and a modicum of dexterity will go a long way. And maybe a bit of (double-sided) tape.

Once detached from the sprue, the two distinct pieces need to be pressed together to form a single whole unit. While you can build these on an as-needed basis, I find it better to sit down in a brightly-lit light-colored environment and just churn out a package or two of these at a time. The little halves do tend to spring away, even during the best of times, and finding the stray piece in poorly lit area is not what I would consider “fun”.

One way you can make the assembly process faster is to grab a bit of tape to hold down one half of the coupler while you press the other part down onto it. Lining up those little pins that hold the two halves together is perhaps the trickiest part of the whole process. Once they’re properly engaged with the opposite hole, the two halves squeeze together with a light press.

Oops! Properly Assembled
Careful... when pressing the two parts together, the neck portions must be parallel. This coupler won’t work, but is easy enough to fix: a gentle twist to bring the two parts of the knuckle together will do the trick. When properly assembled, there should be no gap between the two pieces; here, the inboard end of the coupler (the part that sits in the coupler pocket) looks like one single piece.

The exact means by which by which you’d need to change couplers depends on the manufacturer, and the particular bit of rolling stock. In fact, I have one car from a later manufacturing run than its brethren, and between runs, they changed how the coupler is fastened...

In short, variety abounds. Here are a few ways I’ve done the exchange. There likely are many more. After doing a few, you get comfortable doing it, and can tackle other ways without much trouble.

Installation, Variant 1...

Frequently, you’ll need to remove the truck (or bogie to the UK-derived) from the car. Most rolling stock fastens them by means of a small screw, but the Kato Series 50 passenger car trucks shown here use a pair of spring-loaded notches to hold the truck on an immovable post.

Removing the Truck
For truck-mounted couplers (common for Kato and Tomix) you’ll either have to remove a small screw, or pop the truck off of a flared post, like we do here.

With these, you have to carefully, gently, press the little arm back while lifting the truck enough so the notch clears the crest of the post. An Xacto blade or very small flat-head screwdriver can help with this. Avoid forcing this, because breaking the truck is not a good thing. (Having removable trucks in the way that this breakage offers is a level of prototypical operation few are interested in producing.)

With the truck removed, we can see a cage molded onto the outboard end which holds the coupler, kept in place with a small metal spring.

Holding the truck right-side up, a gentle 90-degree twist of the coupler along its axis pops it out of the cage. Do this over a small container to catch the spring if you’re inclined to reinstall it, because it can just fall out at this point.

Next up: the same in reverse, using the Kato coupler. Press it into the pocket 90 degrees from normal position, then twist it into place. There’s no obvious indication of which is up or down, so it’s possible to install the thing upside-down. This will not result in happiness. ;-] Make sure the coupler knuckle is “right-handed.” To understand what that means, curl your right hand like a coupler: your fingers almost brought to a fist, and your thumb sticking to the left. When the truck is held right-side-up, the coupler should look like your hand. (This, by the way, is the same orientation as other knuckle couplers.)

Not Quite There That’s It!

Once the coupler is in place, give it a test to make sure it stays relatively centered. In my case, this happens without the need of a spring, but if your coupler pocket is larger, it may need the pressure to keep it in line. Also, take a moment to verify the coupler really is installed “right-handed.”

Passing inspections, the truck can be reinstalled: either by a gentle press onto the post, or by the screw, depending on the car.

Installation, Variant 2

In the case of my Tomix KoKi container cars, the couplers are held in place by a small sheet of metal with flanges on the side to hook into the coupler box walls. An Xacto or similar knife, or a very small flat-head screwdriver, pressed down between the plate and the coupler box will typically do the trick.

Popping Off the Cover Catch Disengaged
Press gently, to just loosen the catch. Almost off. I do this in two steps. Less damage that way.

With the cover off, the Arnold coupler can be lifted out. If you’re so inclined, restrain the string (say, a bit of tape) so it stays in place. Then it’s just a matter of dropping the Kato coupler in... but remember the orientation.

In this case, I was able to leave the truck on the body because the cover plate was exposed from below. Because the car is upside-down, I have to install the coupler “left-handed” so that when I turn it right-side-up again, it will be “right handed.” Take a moment to check the coupler is in right.

The Arnold Mechanism The Kato Mechanism
Here’s what the coupler and spring arrangement looks like before. In this case, I kept the spring in. This seems to be optional (so far.) Note: upside-down truck, so left-handed coupler.

Now, another moment needing finesse: putting the cover plate without the coupler (and spring, if present) falling out. If you use tape to restrain things, be sure that it is (or can be) removed. The adhesive will literally gum up the works if left in.

After doing a few of these, you can build up a nice cadence, and get through your collection in fairly short order.

If you’re so inclined, you may leave one or two cars as “hybrids” with different couplers on each end. For example, if your consist remains intact, but changes engines periodically, you may put an operable coupler on the front of the head-end car. If running out and return, the rearmost coupler may also be operable.

...Or blocks of cars may have operable couplers every few cars, to allow cuts of cars to be switched without the expense of operable couplers everywhere.

...Or you may go to meets where they still use Arnold or other style of coupler; this car would allow you to couple to other peoples’ equipment without fuss.

For me, for now, I’m just going with these Kato couplers because they work just as well as, and look better than Arnolds, without breaking the bank.