Wow, it’s been two years since my October 2014 Model Railroad Hobbyist article. If you remember, the article was about using sheets of foamcore to build a trial layout.
|
 |
| I played around with some ideas in the article, but nothing thrilled me... |
In the article, I wrote that you really can do quite a lot with these small modules, but with the rush to publish, I didn’t have the time to back that claim with anything more substantial...
... until now.
I built a couple of those foamcore modules for the article, and they’ve sat idle lo these many months. As far as scenes to depict (like the one on page 131) nothing really spoke to me.
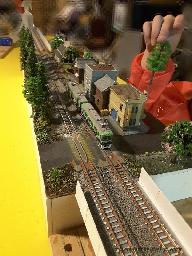
But then my daughter did: seeing that I was putting together some shake-the-box structure kits in a futile effort to clean up the “pending projects” corner, she asked “can I do one, too?” Seizing the opportunity for a bit of daddy-daughter bonding, I let her finish one, and with that, she asked for more.
Nice.
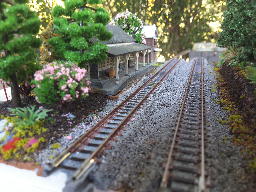
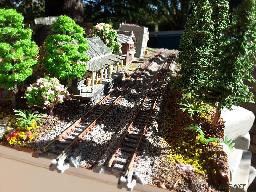
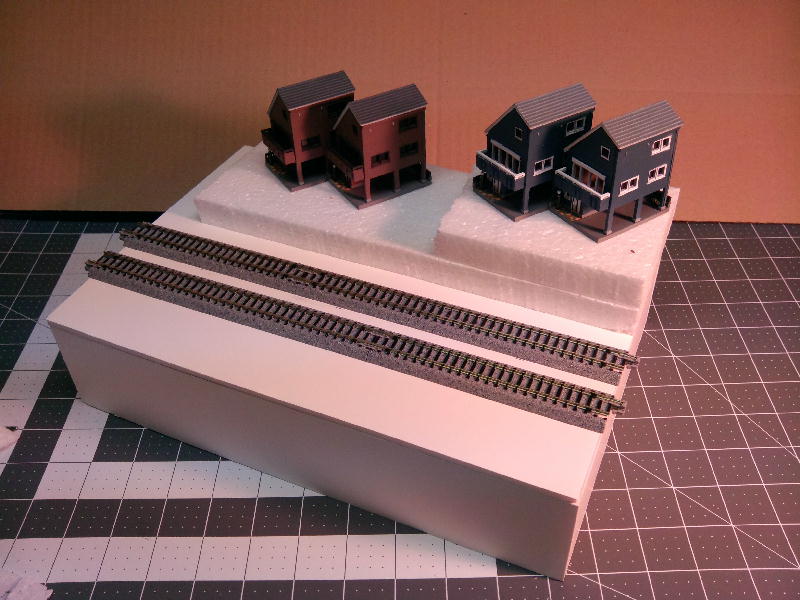
Spying that long-neglected foamcore T-Trak module, I brought it down and suggested we could use those buildings to make a small scene. She agreed, and soon we decided the rough lay of the land—literally and metaphorically speaking—with the three buildings in the foreground (a small, quiet, rural station—inspired by ones we had seen in Okunakayama Kogen on the IGR line, and at Kakunodate on the Akita line—plus a pair of store-front buildings) suggesting the edge of town, and “maybe some trees, or a forest, behind...”
Excellent. The creative juices were flowing, and we were having fun.
True to modern life-styles, though, both of us (reluctantly) had to put it away for a few days. School, work, soccer—and mom—were calling.
|
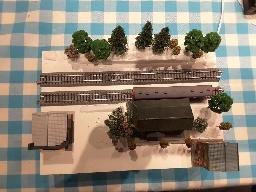 |
| We played around with the buildings, foam, and trees, just laying stuff out to see how it would look. Once the muse spoke, the vision came together, et voila. |
| |
| Styrofoam Terraforming |
 |
| ... courtesy of Ikea packing materials |
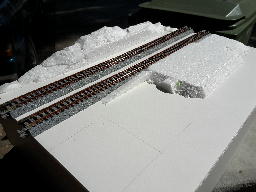
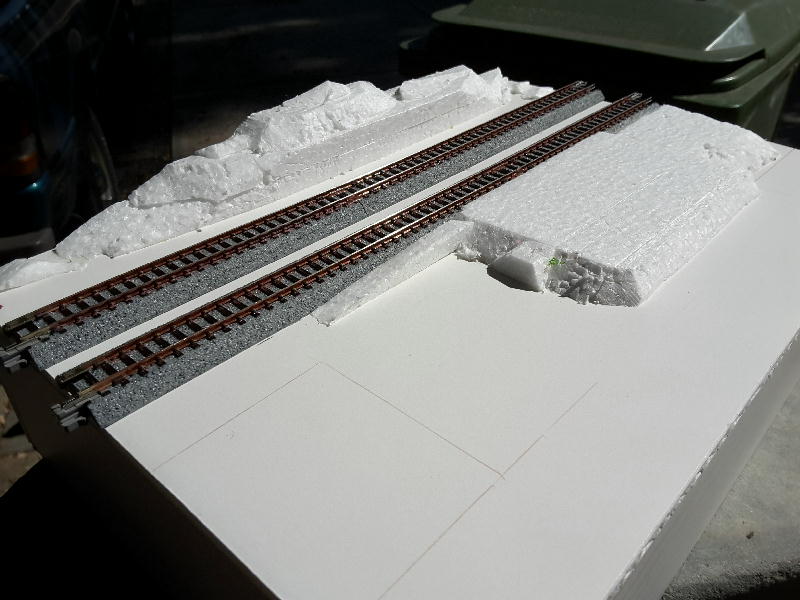
A few days later, I had a few minutes between things, so I did some styrofoam terra-forming, cutting the hillside across the tracks, and a raised platform on which the station would sit to be the right height for trains. A few dabs of white glue set those in place, and once again, the module had to be set aside. This is using that Ikea sheet styrofoam I mention in the article. So the cost of the terrain is essentially free (nothing that comes out of the $500 budget, anyway.)
Finally, the next weekend arrives, and my daughter and I can resume our little modeling project. Here we make the most of our tight budget by relying on a dirt-cheap material that looks super realistic, to boot.
I’m speaking, of course, about real dirt.
It’s late summer, and around here (California) that means it hasn’t rained in months, so the ground is bone dry. We go to a patch of bare earth that’s pretty free of organic matter (dried weeds, and the like) and take a hammer to it, clawing up clods and smashing them to dust. Using a discarded kitchen strainer, we make sure we only keep the fines, setting them aside in a small bucket.
Since it was nearby—and since I had been eyeing it all summer—we also went and picked up a handful of dried pine needles. These were a perfect “redwoody” color, and would also come in handy. And of course, being as dry as they were, there wasn’t likely to be any unwelcome guests in them. These got a stint in an old coffee-bean grinder I found at a garage sale (the thing worked just fine, but the white plastic had yellowed on one side, so the owner didn’t want it anymore... a condition that didn’t bother me in the least.)
So now my daughter and I have scale dirt, and we have scale needles to go beneath the conifer forest.
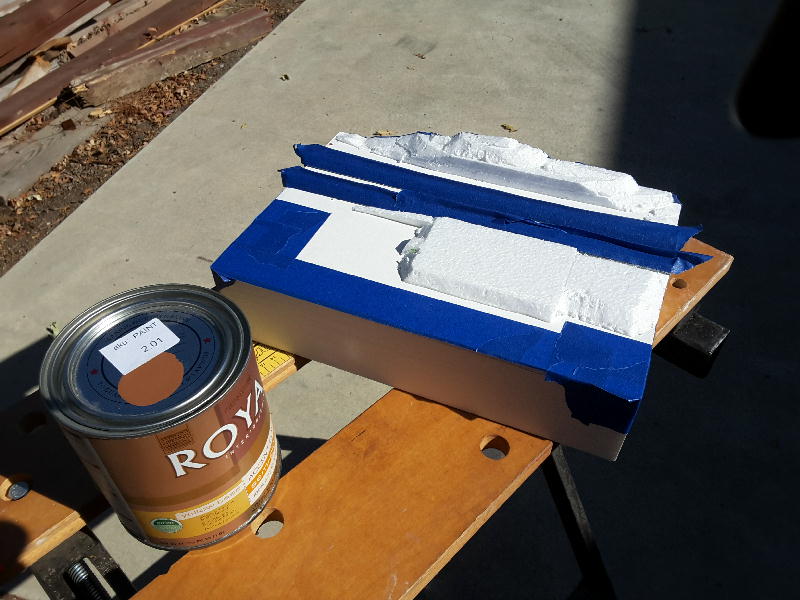
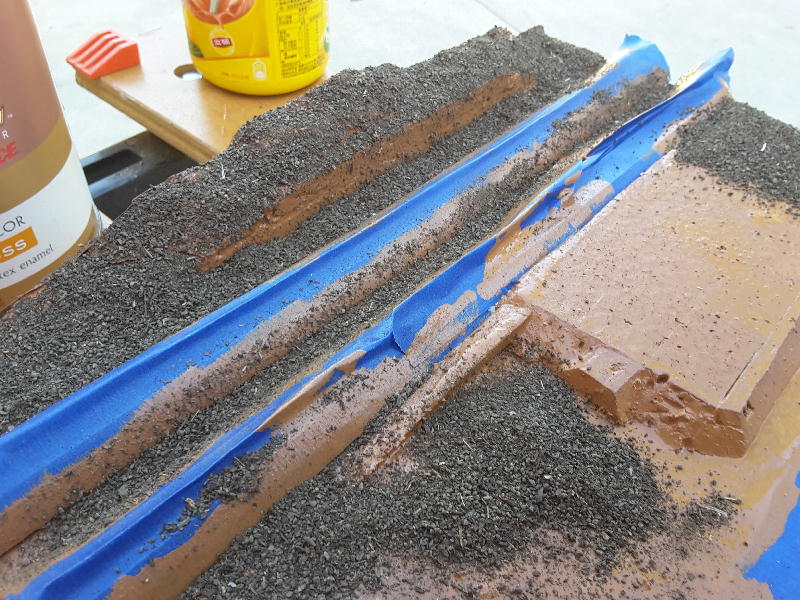
Just one more thing: a quart of earth-toned “Oops” latex paint (hitting the budget at pennies above $2.) Okay ... maybe two things: a bit of masking tape, to protect the rail and any part of the module we don’t want getting “natural” (such as the sides of the module, and the places where the buildings will go.) But I’ll assume you have that laying around and don’t need to buy another roll.
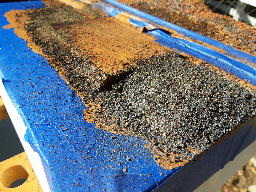
Time to get dirty. With the module’s important parts masked off, anything that’s left is fair game for a reasonable slathering of latex paint. This does two things: covers up the white of the foam, and acts as glue. That’s right... as soon as the paint is down, we sprinkled the dirt we sifted right onto the glistening paint, so the wetter the paint, the better.
|
 | 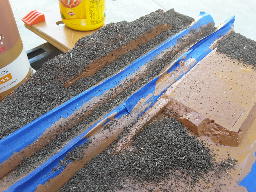 |
| Masked off and ready for oops paint: $2 at the local hardware store | Painted and sprinkled with dirt |
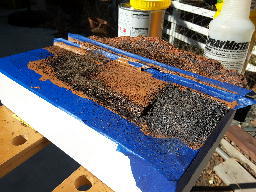 |  |
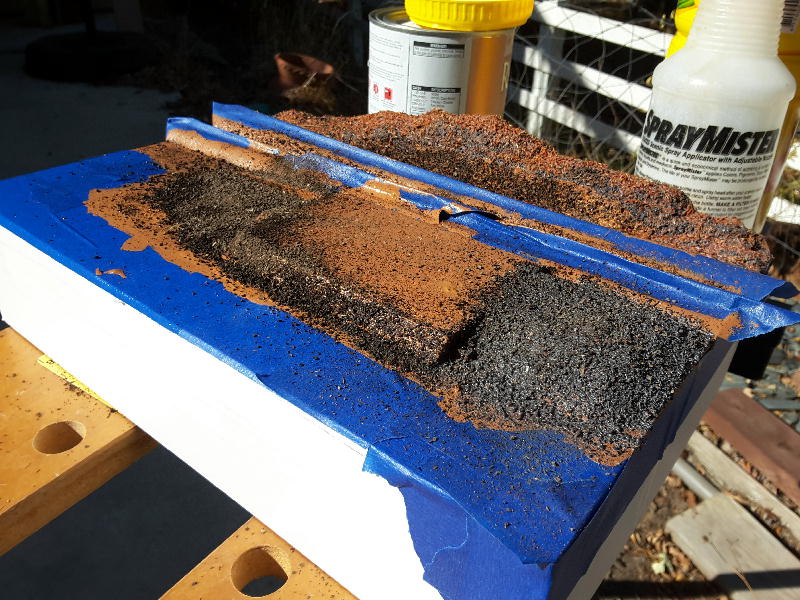
| More dirt, and a dose of matte medium | Closeup: matte medium looks milky wet, but dries clear |
It was a warm day, and the paint was drying somewhat faster than we could keep up, so we cheated a bit. I had some diluted matte medium, which I could spray onto the dirt, and we gave it another sprinkling for better coverage. For the purposes of budget compliance, you can get similar results from very thinned-down white glue, with just a cap-full of rubbing alcohol to make it sink into whatever it is sprayed on. We also did this on the “leaf litter” (the ground up pine needles) we had sprinkled on the soon-to-be-forest floor.
Being the warm day, we did not have long to wait. Turns out, in the time it took for us to clean up the tools and stuff, the module was ready for the next phase: buildings and plantings.
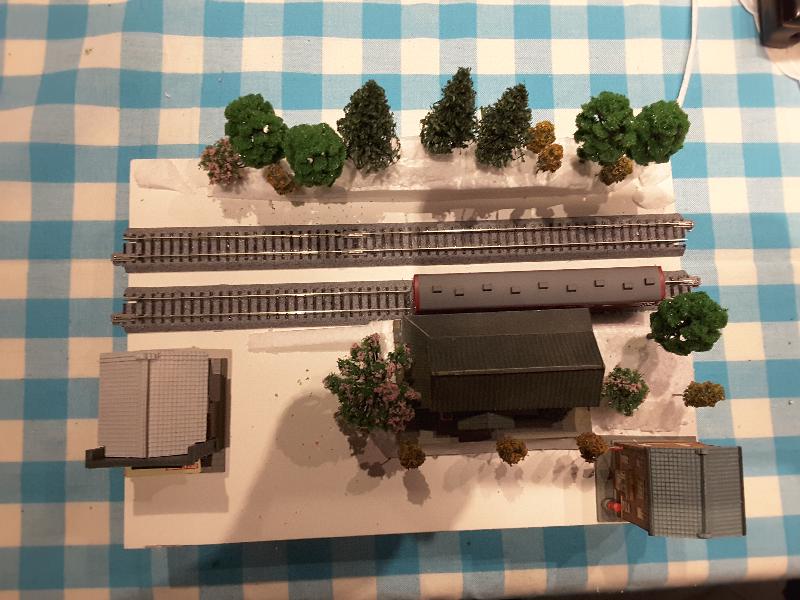
Back at the workbench, we glued down the buildings where we wanted them. Then I pulled out a few cheap bulk trees (you can search eBay for scale trees, and get dozens for a few bucks) and we played landscaper for a bit. Once we were happy, out came the white glue, and we gave the trees a more permanent home.
Bear in mind, though, that these cheap trees are not high quality... not what one might call front-of-the-layout grade. Still, for what my daughter and I were doing, they were pretty reasonable. She was quite tickled with what she had made, and I have to say the module holds up pretty well, too. (Even though I don’t expect to see this module on MRH, with the caption “Yes, it’s a model!” ;-])
|
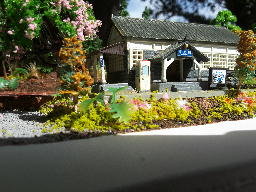 | 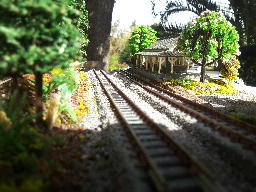 |
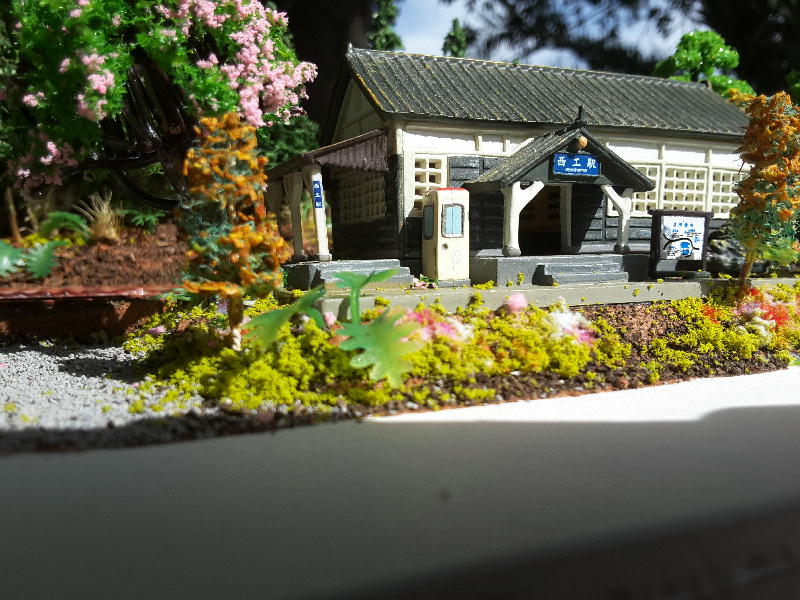
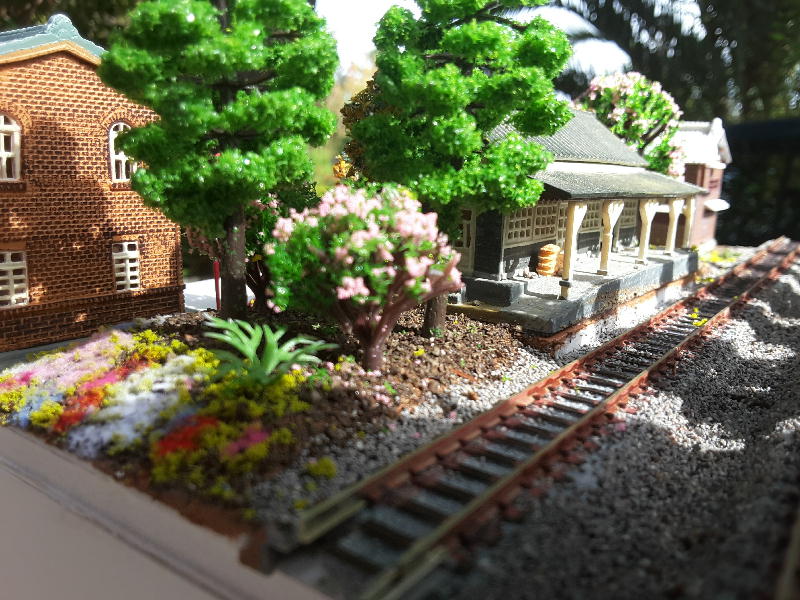
| Streetside at the station | A look down the rails |
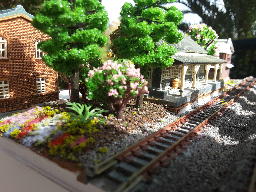 |  |
| The garden beside the station | Down the rails in the shade |
The big takeaway was that we could build a pretty good looking module for not a lot of money, and have fun doing it. Of course, there’s more we can do, if we’re so inclined... but that’s the fun of the hobby: there’s no hard and fast point when you need to say “I’m done!"
Sections: 4
Above and Beyond the Budget
— Thomas M. Tuerke
So, from the perspective of the budget, there’s a lot that can be done. About $15 in buildings, a few dollars in trees, a tiny fraction of the $2 of paint, and a whole lot of free-or-nearly-free stuff gets you a pretty good looking module, with a lot of money left over for more.
But we never said one had to limit oneself; once we’ve answered those fundamental questions of “do I even like this Model Railroading thing?” and “what sort of railroad would I like to model?” we can give ourselves permission to move outside of the budget.
So let’s start a new chapter: Going Beyond the Budget.
But being frugal by nature, I expect to be able to maximize my bang for buck: sure, we’ll relax the $500 total limit set forward in the article, but that doesn’t mean we’ll go all spend-happy. We’ll be sensible and responsible with our new-found freedom. Besides, there’s something rewarding about getting the most out of the least.
(Blah-blah-blah... on to the actual modeling, Thomas!)
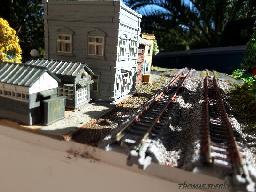
First up: Kato track has roadbed molded to the track, and it looks fair, but with a little bit of “real” (as in not simulated) ballast it can look really good. Using a mixture that is a spot-on match, we can put some realistic texture onto the track. Also, spending a dollar or two on rust-colored markers can make the toy-train sheen of naked rails give way to something a bit more realistic.
So let’s do that. First off, the markers.
This is actually pretty straight forward: press the marker’s tip into the hollow beneath the rail head, and run it along the length of the track, just being sure to stay clear of where the rail joiners will go. The Unijoiners are important not only for holding the modules together, but for electrical conductivity, so paint and the like really needs to be kept from fouling these critical contact areas. Other than that, don’t worry too much about neatness here: this is meant to be rust, after all. You will get some on the “spikes” and maybe even on the ties (sleepers for the UK-derived.) And you’ll likely also get it on the rail heads, too. This is a bit of a problem, for those electrical conductivity reasons I mentioned, but it’s also easy to fix: a bit of wood pushed along the rails will rub this off (but do this before the paint dries; afterwards, you’ll have to use some abrasive, like a bright boy rail cleaner, or some 600-grid sandpaper.)
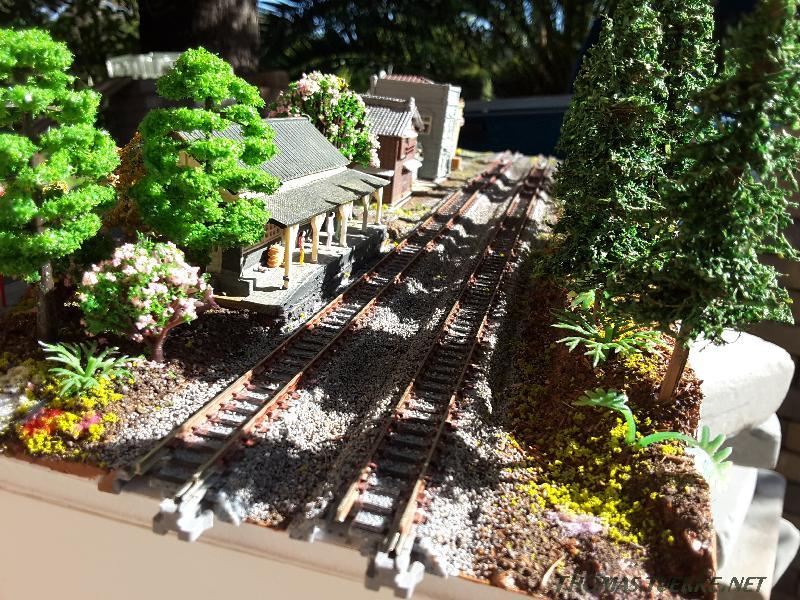
|
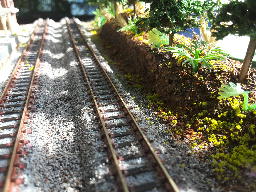 |
| A closer look: ballast on the roadbed, rusted rail, and assorted vegetation... Still a work in progress, so I’ll be touching some things up and adding more details (and when that’s done, knock down the gloss a bit.) |
Over time, the pen tip will mash up. This isn’t a problem, as it starts acting more like a brush than a pen, distributing the rust more liberally along the track and ties. If you study real rails, the whole area—right down to the ballast—eventually is rust-stained, so this is not a bad thing.
|
There are a couple of techniques for holding stuff—like dirt or, in this case, ballast—down: one is to lay down the adhesive first, and sprinkle on the scenic material afterwards; once the adhesive dries, the material should be held in place. We saw that with the paint and dirt, above, and here with getting ballast to stick to sloped surfaces, like the fake roadbed.
Another way is to apply the material—ballast or dirt or what have you—first, and spray or squirt the adhesive afterwards. This works well for larger areas, (but not so well for places where slope would have the material fall away before it’s stuck.)
Also, if the material is dry, surface tension will cause the adhesive to ball up over the material, and generally not hold stuff down. The answer here is to pre-spray the area with rubbing alcohol. This evaporates quickly, but hangs around just long enough to allow the adhesive to sink into the material, holding it in place. And by “spraying” I’m not talking about anything sophisticated. Save the next pump spray bottle from an empty window cleaner, rinse out the left-over fluid, then tip in a bottle of rubbing alcohol (Isopropanol.) I find the 70% variety works best; lower percentages have too much water (disappears slowly) and higher percentages just cost more without offering much more. |
On to ballast. There are hard ways to apply ballast, and there are, well, not-as-hard ways. (But the common element is that they’re all somewhat time-consuming.) Here’s what works for me: take some white glue, diluted a bit to make it more paint-like, and with a cheap brush, dab it onto the slanted parts of the simulated roadbed... but just for a few inches. Follow this with a sprinkling of ballast, possibly even pressing it into the glue. Repeat this along additional sections of track. The goal here is to cover the fake ballast with real ballast along the otherwise hard-to-apply sloped section of track. After that, you can sprinkle a token amount along the flat portion of the roadbed, and drench it with very diluted white glue (think low-fat milk thin) that’s had some rubbing alcohol added... or you could use matte medium, which does the same thing: it tries clear and hard, but completely “flat” or luster-less.
Scenery on the Cheap: Plants
— Thomas M. Tuerke
One of the items that was on the original budget was ground foam. Think mattress foam run through a meat grinder and then stained a variety of "natural" colors (that is, colors found in nature: greens, browns, reds) that you can sprinkle over the ground to simulate grass, brush, freshly tilled soil, or even leaves. This is a quintessential element in scenery, and it helps to have a variety of colors and textures (depending on how finely ground the foam is.) Starting out with a couple of shades of green is a good place to start, and that's what we did on this module. But let's go beyond just ground foam.
Nature is wonderfully diverse. The upshot in modeling that is we need a diversity of materials to give it a natural, realistic look. We did that with paint, dirt, and powdered pine needles. Over that we put a couple colors of green ground foam.
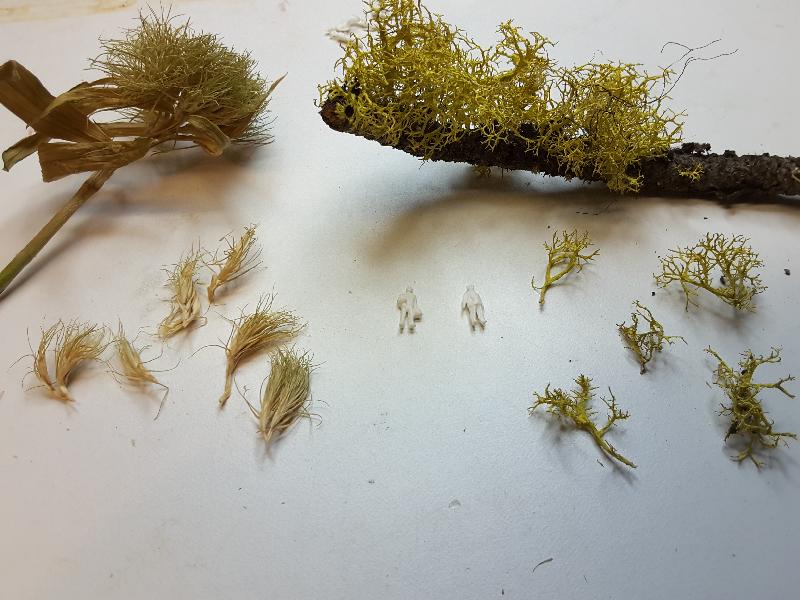
| Scenery Au Naturale... |
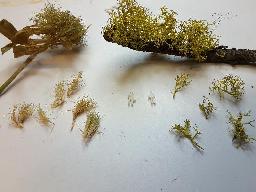 |
| Natural... and free. Trim off bits for nicely detailed trees, shrubs, and grasses. |
| ...And Not So Natural |
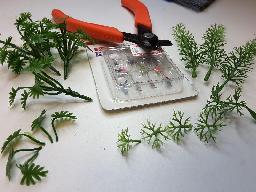 |
| Fish tank "greenery" finds a new use outside the tank. (In both photos, we show some scale human figures, to get a sense of proportion.) |
That got us up to grass. In this case, my daughter and I are modeling Japan, which is considerably more lush. And that means many many more layers of lushness. So one sort of treatment—like ground foam alone—just won't get us what we're looking for. We need shrubs and plants of all sorts of variety, in various stages of development: new growth, and dead wood, and all manner of greenery in between.
Keeping a careful eye out for scenic "opportunities" comes in handy here. Some of the most natural looking stuff comes straight from nature, so things like lichen and mosses can be useful. On a trip through logging country, I found all manner of growth on branches cast off on the side of the road. That stuff was essentially free.
But opportunities exist elsewhere, too. A pet shop had some bulk plastic "sea grass" that had an interesting look to it. As it was, it was grossly out of scale as well as too readily betraying its plastic origin... but both of those could be fixed. In this case, chopping up the far-too-large "plant" into individual fronds resulted in workable undergrowth, and a shot of matte finish takes down the unnatural glossiness.
Remember: it's about always keeping an eye out for opportunity. And those opportunities won't always be labeled "will work well for scenery!" (Usually, when that's the case, somebody will charge a premium for having done all the clever stuff for you...)
Onward from there, leftover sawdust, strained through a filter like the dirt has been, can also be dyed to look like foliage. (In fact, before ground foam became popular, using sawdust was the norm.) Playing with combinations of foam and sawdust you can create even more variations on shade and texture.
Sister See, Sister Do
— Thomas M. Tuerke
Okay, so lil' sis saw big sis make a module, and said "Daddy! I want to make one, too!"
Of course. Sister see, sister do.
Well, turns out I had two modules from the article, so keeping the peace—and nurturing an interest in modeling—was easy.
"Sure; let's make one that can be right next to your sister's."
"Can I have a station, too?"
"Hmmm... I don't think we need two stations so close to each other." (And besides, I didn't have another one around.) "But yours can have more houses." That part appealed to her. Noting that I had used that module to experiment with the Kato crossing/rerailers, I added "... and you can have a railroad crossing, too."
Double joy. "Okay!"
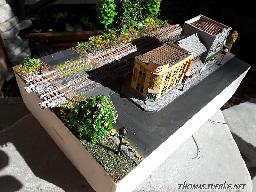
We picked a number of already-built structures—the fruit of burning down the backlog of projects—and decided how we would arrange them. It became pretty clear that we'd continue the street from the other module. One of the buildings was a corner building, so it quite logically belonged at the crossroad between the perpendicular street at the railroad crossing, and the business lane that ran in front of the station.
 |
| Hmmm... does this street need a tree? My youngest contemplates tree locations as we are finishing up her module. (Yes, that's the Tetsudo Musume ad-wrapped Keihan 700 that we motorized.) |
A further plus was that it was a small shipping company, plausible in close proximity to the station as well as at a crossroad. We spent some time "imagining" how the people lived in this village. Visitors from out of town arrived at the train station, walked to the jewelry store and the restaurant, and then to the park (we decided that the cross-road would really just be a T, and that the other side would be a park.) We imagined that people who lived in town might visit the pharmacy, the restaurant, or send packages using the shipping company, or take trips to other places from the train station.
In other words, we discussed the economic justification for these places, without getting all boring and grown-up about it.
She also wanted trees, too. A forest, just like her sister's module. So we continued the cut on the far side of the tracks, and proposed a number of trees.
Now, her attention span was a bit shorter than her sister's, so we left things at that while she pursued other momentary interests. Meanwhile, I glued down the building bases and Styrofoam land forms, ballasted the track, and painted the street, then smothered the land with paint onto which I sprinkled the dirt, just like the first module. By the time she came back, the module had "magically" transformed from white poster-board into a small world.
"Wanna help plant the trees?"
We started by clipping up some plastic fish-bowl plants into some shrubs, and glued them down along the hillside.
Fascination flowed as the barren hill was starting to show some green. A lush mixture of plant types made for some nice undergrowth. Then, the trees. Poke a hole with a nail, dab the trunk into the glue, and press it in nice and straight. In a few minutes, voila: a forest.
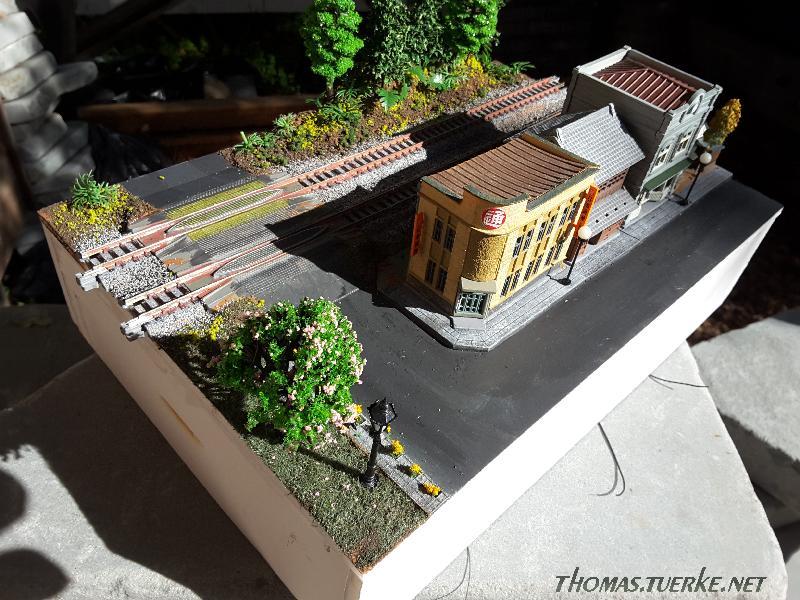
| The "Finished" Module (insofar as anything is ever finished...) |
 | 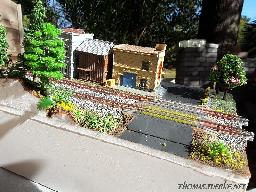 |
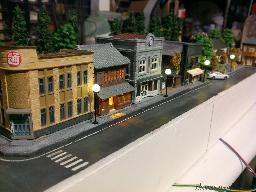
| I've never been fond of shots from high angles, but in order to get this photo of Ekidori (literally Station Street), I put the camera on the ol' drone and sent it up to a giant's shoulder level. But who sees the world from that angle? | As I bring the drone back down to the landing area, we grab a view of the track-facing side of the Ekidori's buildings here, from across the tracks right at the edge of the woods. Nice, on a sunny day. |
| |
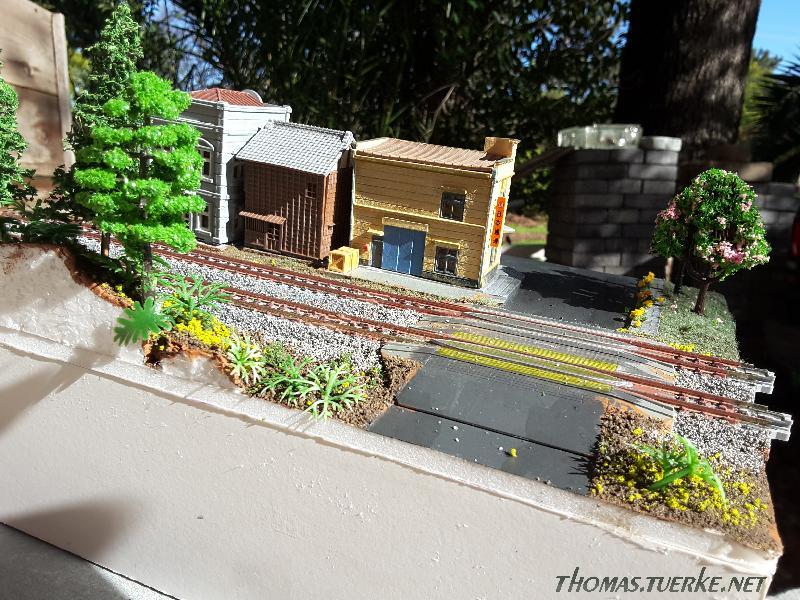
 |  |
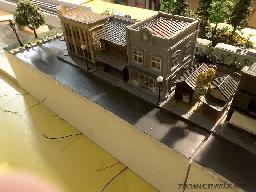
| Looking down the tracks, the visitor's center, rest rooms, historical center, and shipping company are all visible. Visitors can later go and get some fresh ramen at the ramen store, just out of sight beyond the historical center. | The view down the tracks is pretty nice. There's a good sense of continuity here. Yes, it's a module (not that you'd be fooled into thinking it's a full-scale town) but more importantly, yes, it's a module made of foam-core. Two modules, actually. |
| |
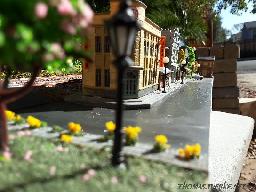 |  |
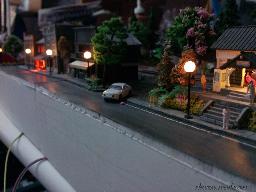
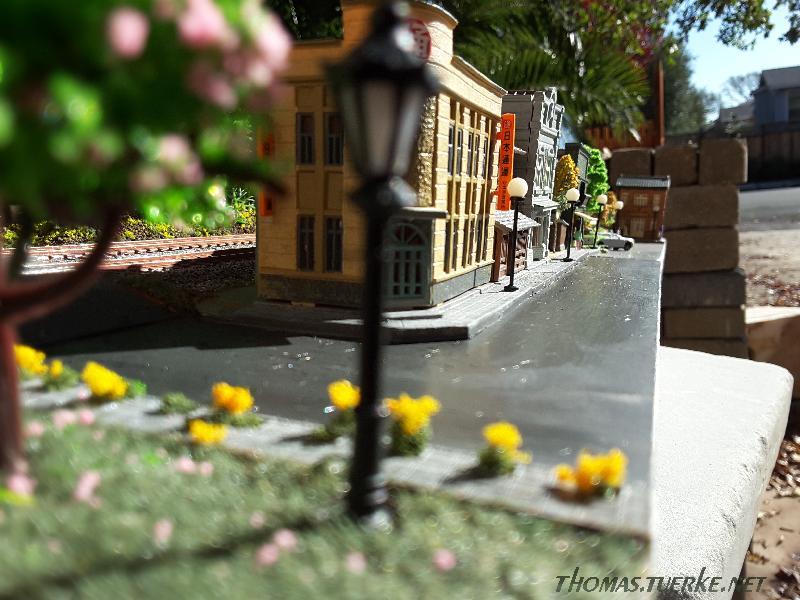
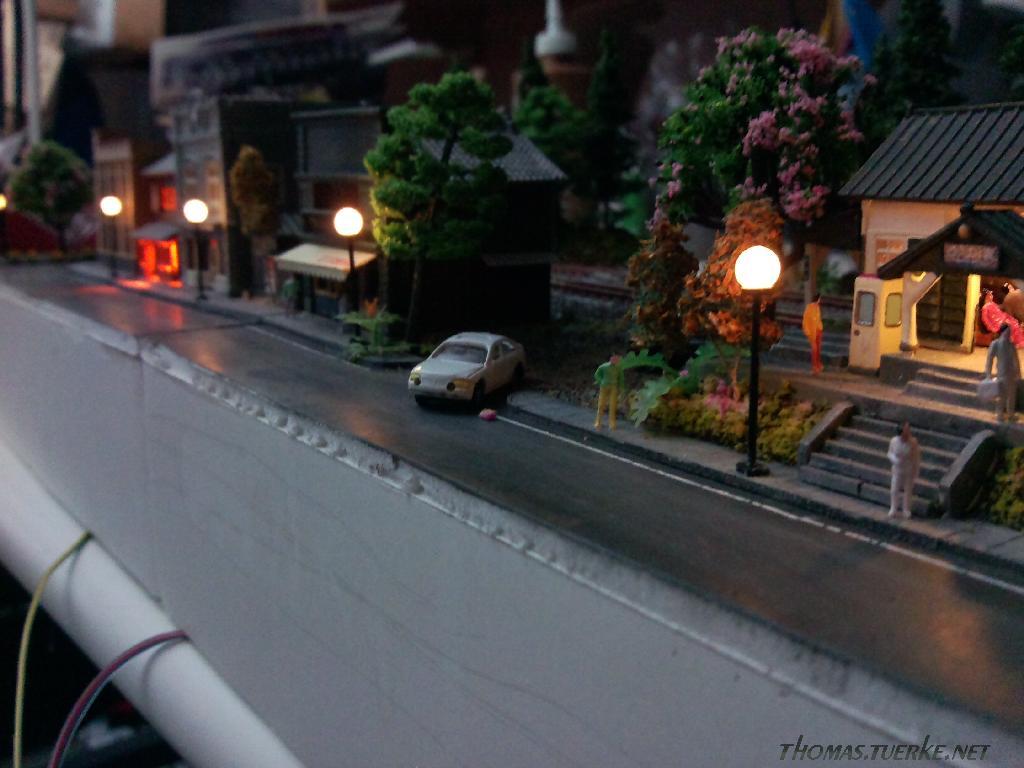
| The best shots are always from eye level. Here we look down the street from the park, toward the old station. Yes, those are working street lamps. More about that soon. | A somewhat more utilitarian view of the street side of the module. The wires belong to the (functioning) street lamps... |
She was glowing with pride, and wanted to show mommy what she had made.
With a little help from daddy, it turned out pretty good, actually.
Lighting a Module
— Thomas M. Tuerke
|
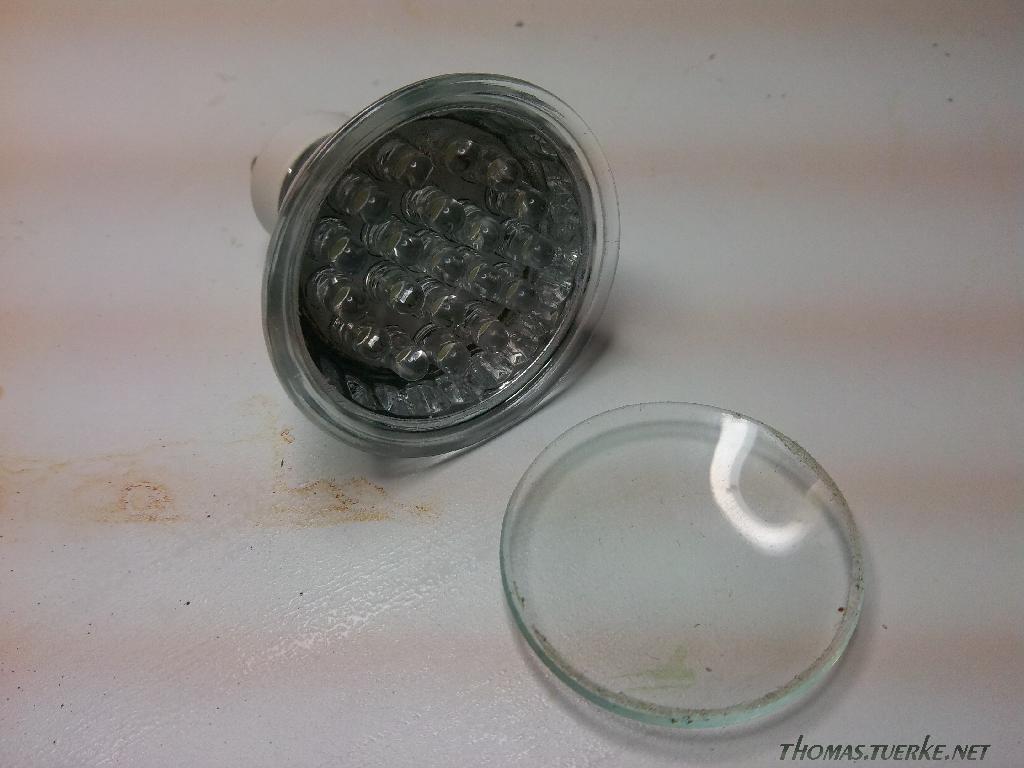
Here's an inexpensive source of LEDs for your modeling: those "burned out" LED bulbs.
LEDs last a long, long time (in the tens of thousands of hours, or something on the order of 5 years of continuous use.) But somehow, some of the early LED bulbs didn't live up to that claim. I've installed a few that have gone south on me after a very short while. What gives?
Well, it's not the LEDs, per se, but some of the circuitry behind them, that isn't up for the long haul. If one LED is not up to snuff, it goes dark but the rest keep burning. If the circuit goes bad, all the bulbs go dark.
The good news is, the LEDs may still work just fine. Just not in the light fixture the bulb was previously installed in. If you're comfortable dissecting an LED bulb—and desoldering components—a dozen or more LEDs may be yours for the taking... and putting to use in any of your modeling lighting needs. |
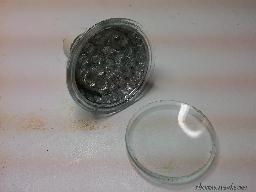 |
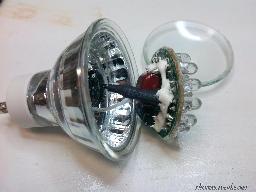
| In this case, a 20-LED cool-white bulb started to flicker and misbehave. I replaced it with a new bulb, but wasn't ready to send a bunch of potentially good LEDs to the landfill. A little bit of probing with a small screwdriver showed that the glass lens was held on by some silicone rubber adhesive—roughly the same stuff as the clear tub caulk—and could be lifted off the reflector fairly easily. |
 |
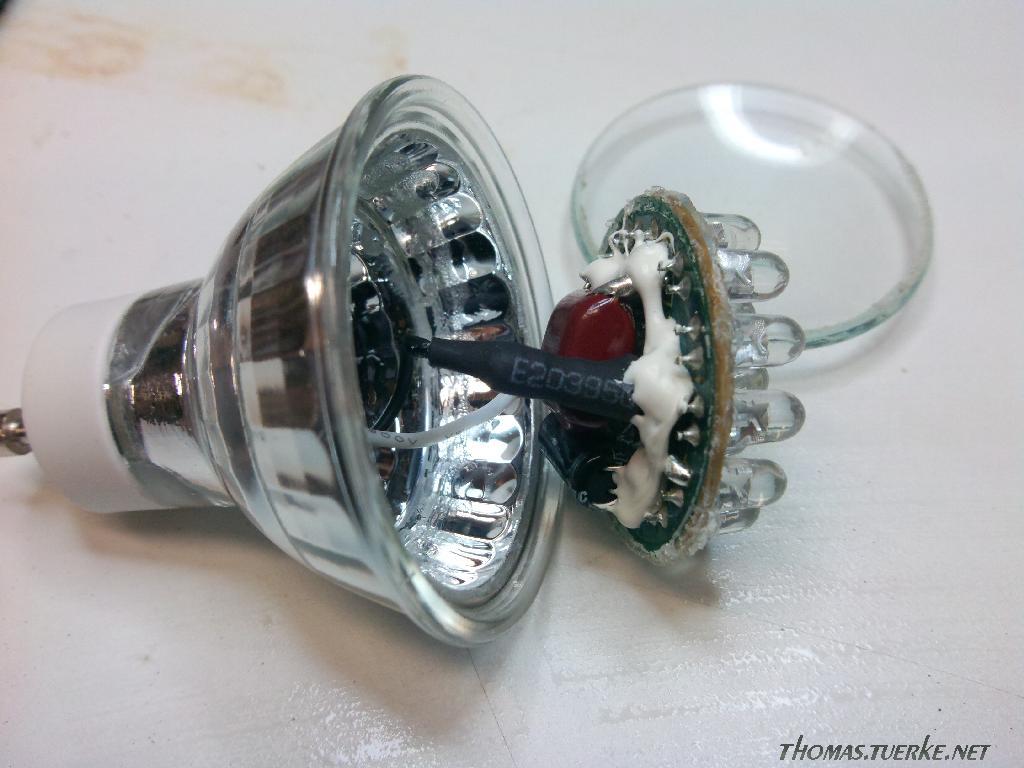
| Further prodding showed that the LED board was similarly held in place by silicone adhesive, and in no time I had the board pulled out, held only by two wires that connect the bulb to the base. |
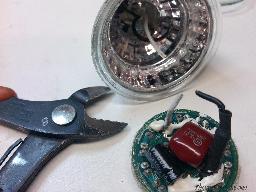 |
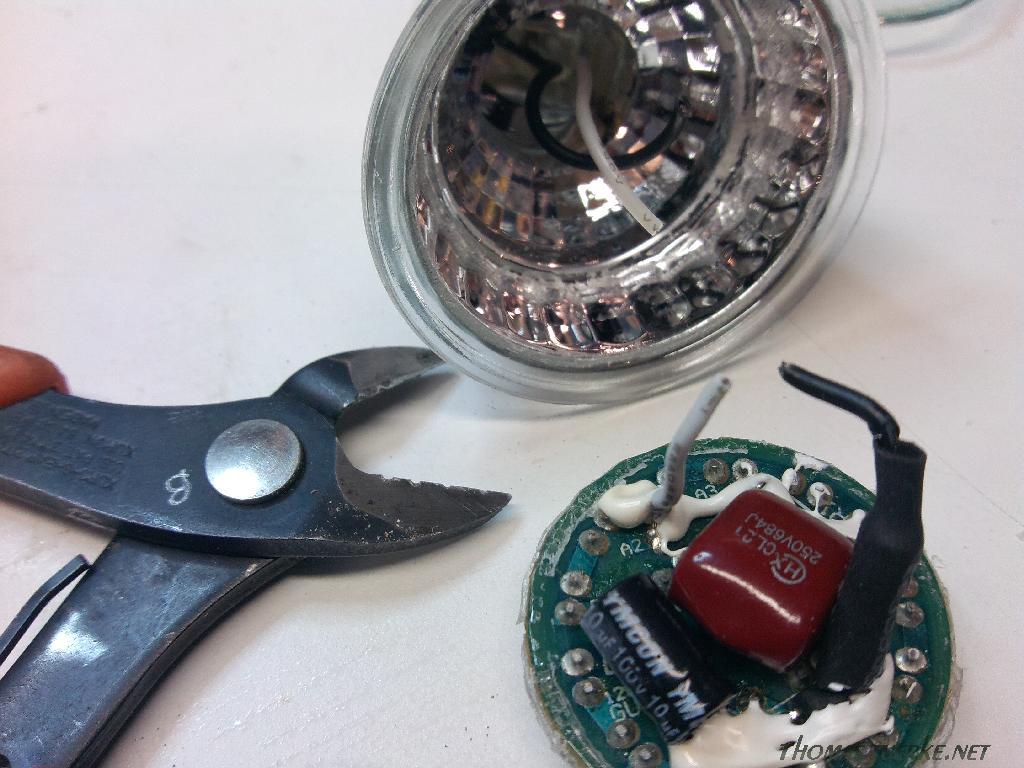
| Snip. Snip. The circuit board is now free. By the way, that "fat" part of the black wire (shrouded in shrink-wrap) is really a fuse... in other words, something else that can make the bulb stop working, even though the LEDs are just fine. |
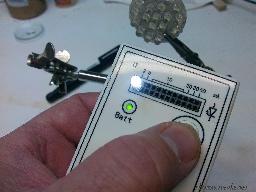 |
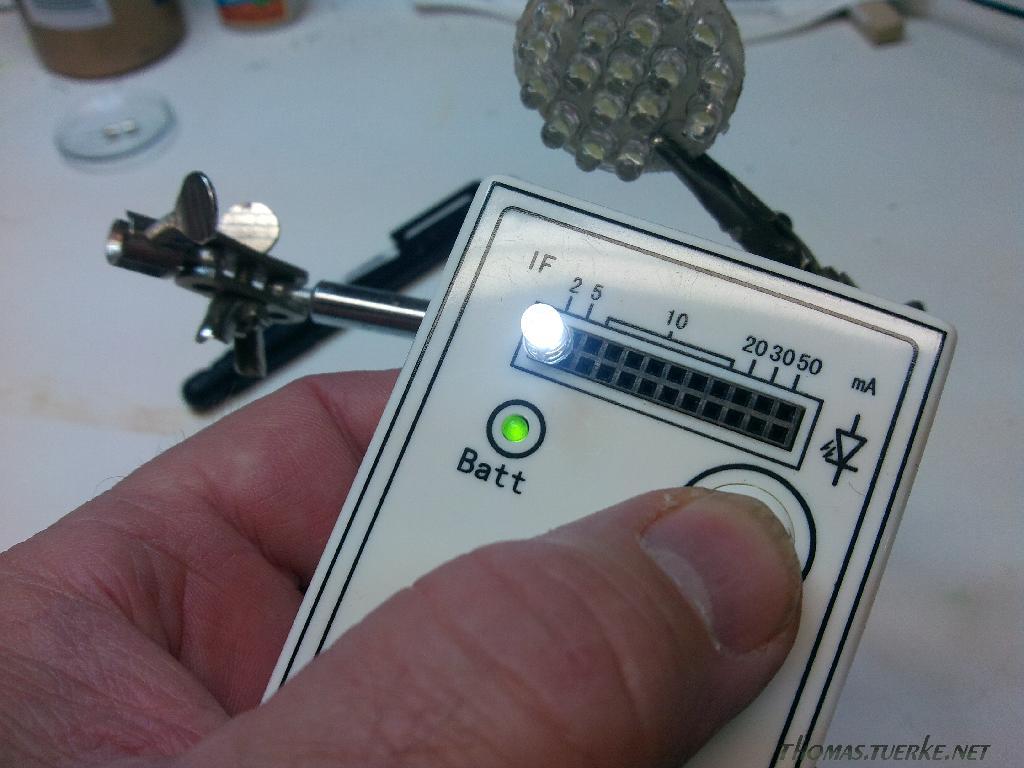
Now to the soldering iron. Applying quick heat to one LED's leads, and pulling it out, I was able to test it in the LED tester: voila... one perfectly good cool-white LED (albeit with very short leads.)
I've dismantled other LED bulbs, some of which had longer leads (in that case, I was able to use nippers rather than desoldering) and as a result, have been able to repurpose dozens of perfectly functional LEDs that otherwise would have been thrown away.
By the way, if you're going to do anything with LEDs, do invest in an LED tester... (or make one...) You'll be glad you did. |
For the time being, it's impractical to fully animate your modules: people don't walk, cars don't drive (well, maybe, if you have the Tomix Bus System, buses move) but for the most part, other than the trains, your modules are relatively static.
Though it would be nice to have more action, one touch that makes a railroad more "alive" is lighting. Fortunately, it's also easy to do, especially now in the days of LED lighting. As always, there are commercial products that you can use to set your world alight, but there'd be no point in writing about those; the manual that comes with whatever product you use should cover anything that isn't pretty much self-evident.
No, I'll be doing this "DIY"... I think it's more fun that way. You either agree, which is why you're reading this, or disagree, in which case you'll close this page and see what ebay has on offer instead. Either way, it's all good.
Way back when, scale lighting involved tiny "grain of wheat" or "grain of rice" bulbs—little incandescent bulbs that worked just like their full-size counterparts—but since they were specialty items—low-volume and hard to manufacture—they were fairly expensive. Oh, and of course, like full-size bulbs, they burned out, so you had to worry about how you would replace them. Let's not forget that they were as inefficient as regular bulbs were, producing many times more heat than light... so it meant they had to be driven by higher voltages. Tedious. A workable solution for most applications was one of those old style Christmas tree strings, but even that had limits.
Nowadays, LEDs are everywhere, even to the point of driving the old Edison-style filament Incandescent bulb to extinction. Even though early LED bulbs left much to be desired, nowadays, this displacement is a good thing.
A side effect of this is that little LEDs—what most LED bulbs are still made from—are getting less and less expensive. Their small size, low voltage requirements,and even lower heat output, make them all the more suitable for modeling use. Just a couple of things to be aware of, and you're in business.
LEDs come in a rainbow of colors, from the early reds to the far more recent blue and various white varieties... and even white LEDs come in many color "temperatures", ranging from "cool" to "daylight" to "warm" (basically varying the amount of blue and yellow light they emit) Nowadays, warm white LEDs do a good job imitating incandescent, cool whites make a convincing fluorescent, and you can do some clever things with orange and amber bulbs to imitate sodium vapor lights. Many of these things were simply not possible with things like grains of wheat.
The Station Module
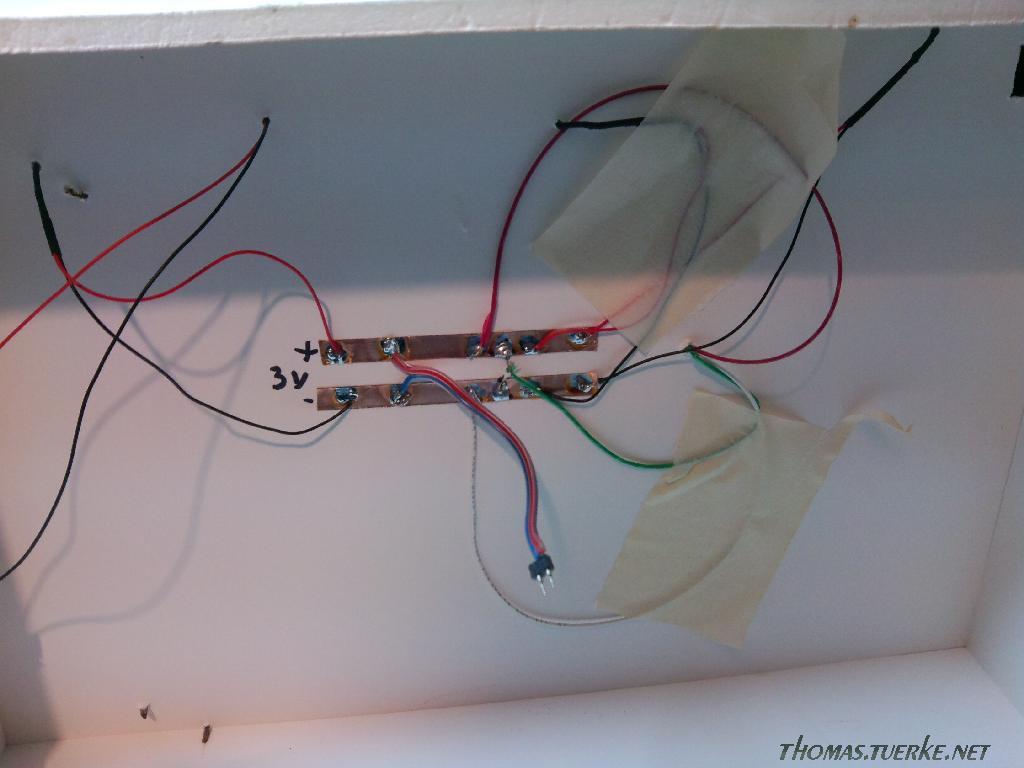
Realizing that I would be connecting several sets of LEDs, I started by creating a "bus" using two short strips of copper tape fastened underneath the center of the module. This would be where all the main lighting would be soldered to, as well as the power source, and simplifies connection.
|
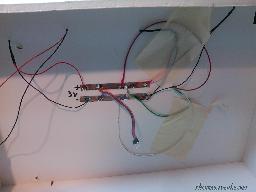 |
| The power bus allows me to manage the wiring somewhat. The tape holds wiring in place while I work out the logistics. The connector plugs into a 3v battery pack. |
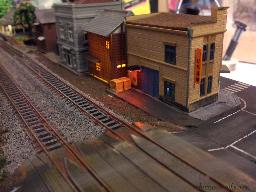
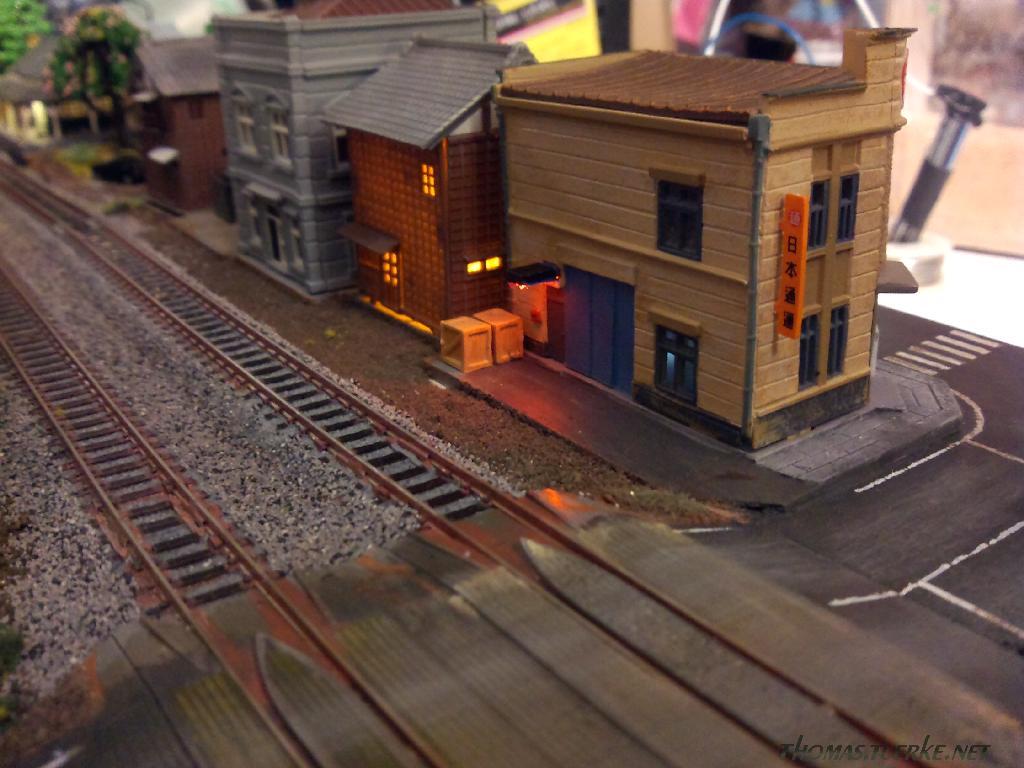
Lighting the station itself involved 3 reclaimed cool white LEDs to imitate the fluorescent fixtures that are so frequently found in such places. One would illuminate the entrance, one the platform, and the third the interior of the building. These first two required drilling small holes with a pin vice in order to pass the leads through to the "interior" wiring. All three bulbs are lit in parallel, so one wire connects all the anodes; another, all the cathodes. (That's new from bulb terminology: LEDs are Light Emitting Diodes, meaning that electricity only flows one way, unlike old incandescent bulbs, which would work regardless of which way they were hooked up.)
Okay, so I did use some commercial products: I had several street lights, so I mounted these along the sidewalk on the street in front of the station. These, too, are LED driven, so I ran the wires to the bus as well.
The one outlier was the lit car, which requires 9 volts. I haven't cracked it open, but there's a resistor within the actual car body that I've been meaning to bypass, in order to make the car also run on the 3 volt system I'm using. Until then, it remains on its own system.
A simple LED with wire leads is similarly placed in the building to the right.
The Ekidori Module
Here, there are more buildings, and each of them gets a slightly different treatment; in sum, the lighting here is more subdued and subtle, to not up-stage the station itself.
|
 |
| A square orange-amber LED looks like the awning it replaced, and sheds that characteristic orange color (which the camera made a bit more intense than reality.) |
The Shipping company gets some fluorescent-like cool white LEDs for the interior, and an orange light in the back to imitate a sodium vapor light. Next door, the restaurant is lit by a yellow LED to imitate a more intimate low-lit eatery. There's a police station with its cold white light, and the public restroom with its wan incandescent-like light as well. Each of these is tied to a bus on underneath the module as well.
|
 |  |
| Two views of Ekidori from opposite ends of the street. (Still on the workbench.) By the way, the MRH article mentions using sharp blades. In the foreground, we see a tattered foam core, the result of a less-than-razor-sharp blade. |
| |
| | 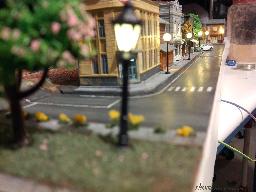 |
| Recreating the daylight shot (see above) but this time "at night". (Yes, some of the poles took a bit of damage and need to be straightened up: these modules are rather prototypical, insofar as they're quite "earthquake" prone.) |


 Generate a QR code link to this page